Showing posts with label tumbler quilt. Show all posts

Saturday, 19 May 2012

A Complete Set

With the doll quilt finished I began work on a little pillow and pillowcase to match, also inspired by the doll bedding tutorial. After a bit of OTT maths (if I want the pillow to be this big with this curvature...) I soon had a pillow :)

very satisfying when you end up with one pin of every colour :)


Next, the pillowcase. I decided to have a strip of another colour rather than two different-coloured sections. I also did a quick bit of embroidery to add a flower :) Quick tip for anyone thinking of taking up sewing: find a husband who can draw. This comes in very handy.


I love that you end up with a proper little pillowcase which you can take the pillow out of and put it back into. I think I would have found that fun as a child. But then I was the child who 'played with Duplo' by sorting the pieces by colour and shape...

And so, there you have it :) One completed doll bedding set.


Since I don't currently own any dolls, my dear friend Bones agreed to be the model!

Coming soon: another appliqué project for the recipient's little brother :)

Sunday, 13 May 2012

Appliqué

I like the word appliqué. It sounds very fancy. In the context of sewing it basically means 'I put one piece of fabric on top of another and did x, y, z to make sure it wouldn't come off'. But saying appliqué makes it sound far more impressive.

Anyway, the reason for this ramble is that I tried out appliqué for the first time on the back of the doll quilt I showed you before. I was inspired by a tutorial at Sew Like My Mom: she's made so many fun things, and I love the way she's used appliqu
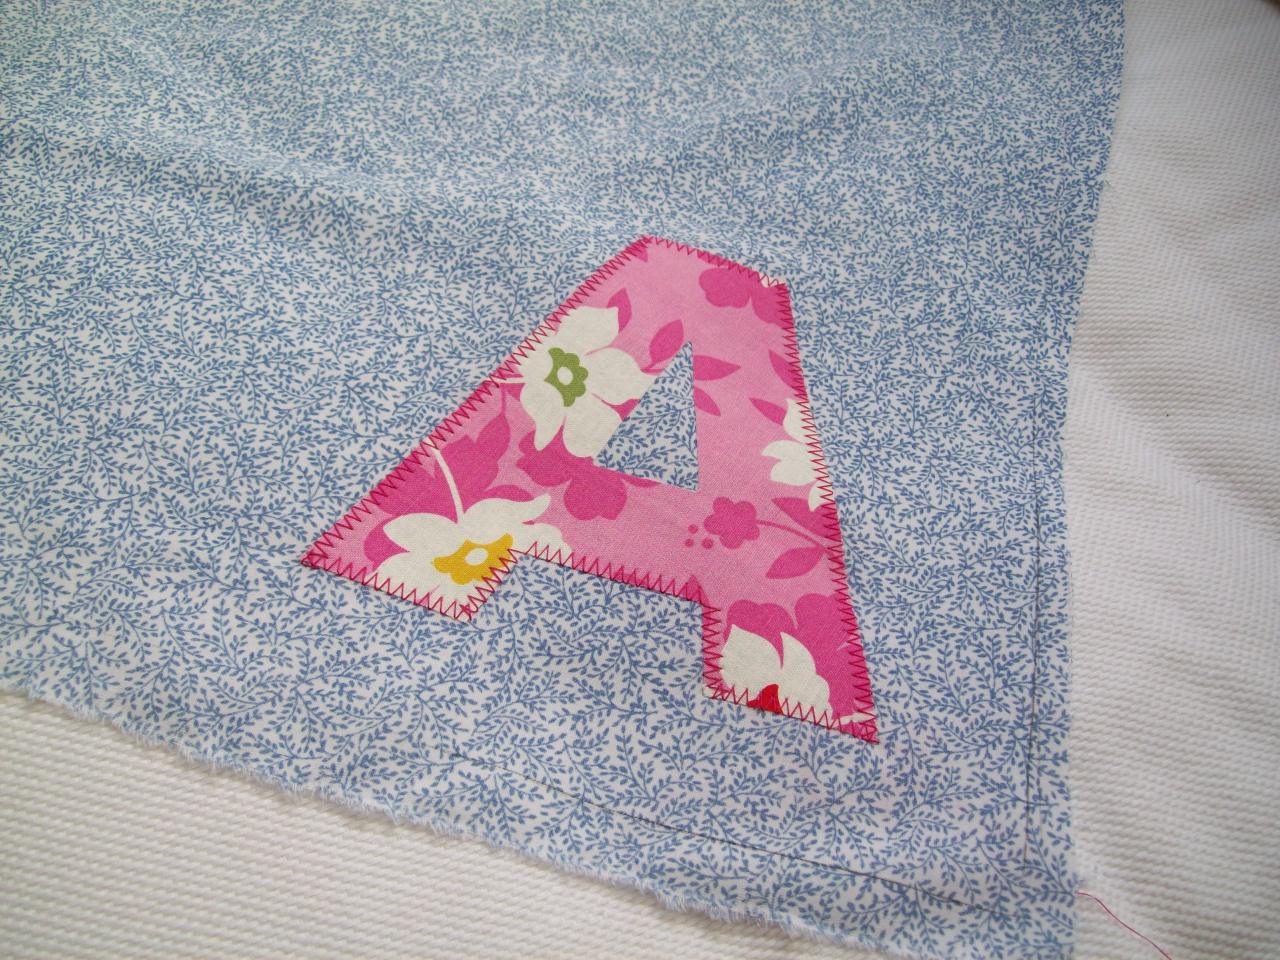
é. I found an equivalent of Heat 'n' Bond (Bondaweb) at a local fabric shop, found a simple image of a letter A via Google images and began following the instructions.


Thankfully the letter A is horizontally symmetrical so I didn't need to worry about any potential 'you can only look at this quilt in the mirror' issues. Having ironed on the A I then began to sew around it. And oh my goodness, was it fun! I had a great big stupid grin on my face the whole time. Just look at how cute those zig-zags are!


I'll definitely be using this technique a lot more in future. I've already used it in 2 other projects, and I'm still loving it.


After finishing the backing, all that was left was to bind the quilt. It would be a bit of an understatement to say that the binding process didn't go well. I won't go into details, but it was third time lucky in the end... And then I found this tutorial on an awesome blog named In Color Order. Her technique involved not only a neater way of doing the corners, but also a way to avoid having to hand-sew together the dreaded join. I was excited to say the least. But was it worth unpicking the binding which I'd already got wrong so many times? After a few deep breaths I decided it was, and gave the new method a go. It worked amazingly! So grateful for Jeni's tutorial. I did a couple of things differently (stuck to hand-sewing-to-the-back and sorted the corners and join when I got to them rather than at the start) but her tips were so, so helpful :)


I'll post full pictures plus the last bit of this project soon :)

Monday, 7 May 2012

Tumbling

A little while ago, I decided that the 'I've run out of pregnant friends' gap would be a good oppurtunity to try out making a doll quilt. I was inspired by this post on Crazy Mom Quilts: she has such good ideas! Picking out fabrics was a little tricky: I wanted to use fabric I already owned, but when I picked out all the girly fabrics they looked rather sickly-sweet together. So instead I went for a mix of pink, blue and white:


I absolutely love the pink fabric. It's from the Nicey Jane collection by Heather Bailey. It was bought to become part of a picnic-rug-quilt I was planning to make and keep which hasn't quite happened yet (maybe one day!). The other fabrics are completely different: the blue is part of a duvet cover from Oxfam and the white is from the local cheap fabric shop. Gotta love the variety :)


I decided to try out this tutorial and make a 'tumbler' quilt. The mathematician in me (I studied maths at uni) rebelled against the template idea: surely geometry would produce more accurate tumblers? So instead I did a few calculations and used the gridlines on the mat to get the correct angles. Much better. Although quite a slow process; not sure yet whether my perfectionism is going to turn out to be a blessing or a curse with quilting!

This was my first quilt with non-right-angled patchwork and it was tricky to piece. When piecing the tumblers you had to judge 1/4 inch distances by eye. Not my strong point. But I persevered, and I'm so glad I did. I had to re-do about two or three of the joins per row (perfectionism strikes again...) but eventually got them all about right and I love the result.


the post-it note was a reminder that the tumbler needed re-doing when I could face it!

The above photo proved to be very helpful later on: when it came to sewing the rows together I got the first seam wrong (I sewed the top of row 1 to the bottom of row 2) and then couldn't get the pattern to work. My husband Laurence and I spent a long time staring at the blocks while I tried to figure out if I really was silly enough to have created a set which didn't fit together. Eventually figured out my mistake using the photo, unpicked and resewed and it all came together to look like this!


Ta-dah! One complete quilt top. Tune in again soon to see the fun I had with the back of this quilt :)